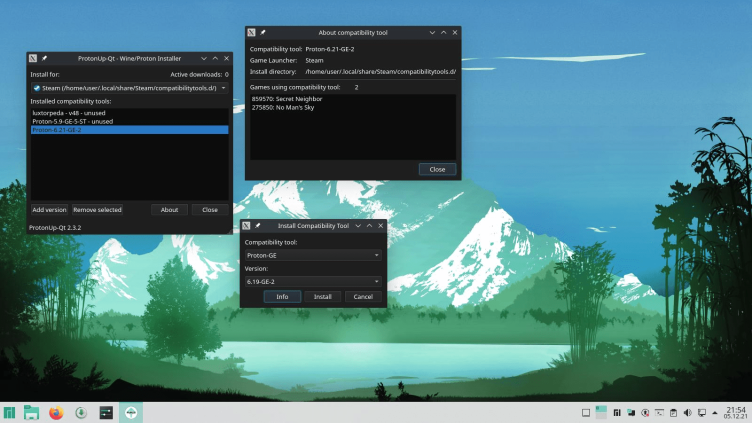
Installing custom GE-Proton builds using ProtonUp-Qt is the easiest graphical way to manage custom compatibility layers on Linux. It handles downloading, extracting, and placing GE-Proton directly into Steam's (or Lutris/Heroic's) compatibility directories automatically.
1.Install ProtonUp-Qt:Prerequisite for graphical management.
The standard, distro-agnostic way to install ProtonUp-Qt is via Flatpak:
Bash
flatpak install flathub net.davidotek.pupgui2
Alternatively, download the standalone AppImage from the official ProtonUp-Qt GitHub releases page or install it through your distribution's package manager (e.g., protonup-qt on Arch/AUR or Fedora).
2.Select Your Game Launcher:
Launch ProtonUp-Qt. At the top of the window, locate the Install for: dropdown menu:
-
Select Steam (or choose Heroic Games Launcher, Lutris, or Bottles if managing compatibility tools for non-Steam platforms).
3.Download and Install GE-Proton:
-
Click the Add version button at the bottom left.
-
Ensure Compatibility tool is set to GE-Proton (or Proton-GE).
-
Choose your desired release from the Version dropdown (typically the latest release).
-
Click Install.
ProtonUp-Qt will download and extract the files directly into your Steam compatibilitytools.d directory.
4.Restart Steam and Assign GE-Proton:Required for Steam to discover new compatibility tools.
Important: Completely exit and restart Steam so it can detect the newly added compatibility tool.
-
For a Specific Game:
-
Right-click the game in your Steam Library and select Properties.
-
Open the Compatibility tab.
-
Check "Force the use of a specific Steam Play compatibility tool".
-
Select your newly installed GE-Proton build from the dropdown menu.
-
-
As Global Default for All Windows Games:
-
Go to Steam > Settings > Compatibility.
-
Enable "Enable Steam Play for all other titles".
-
Select GE-Proton from the dropdown menu.
-
0 commenti:
Post a Comment